How to Use a Compass with a Map- Become a Navigational Superstar
If you’re reading this article, you should already have a good compass with all the necessary features to make it useful in the backcountry. You should know how to take and follow a field bearing. And you should be familiar and confident with topographic map reading.
If that’s you then congratulations! You’re ready to cement your navigational superpowers by learning how to use a compass with a map. Let’s get started.
But If you’re just getting started with a compass click here and read this article first.
And if you need to brush up on your topo skills, click here to read this one.
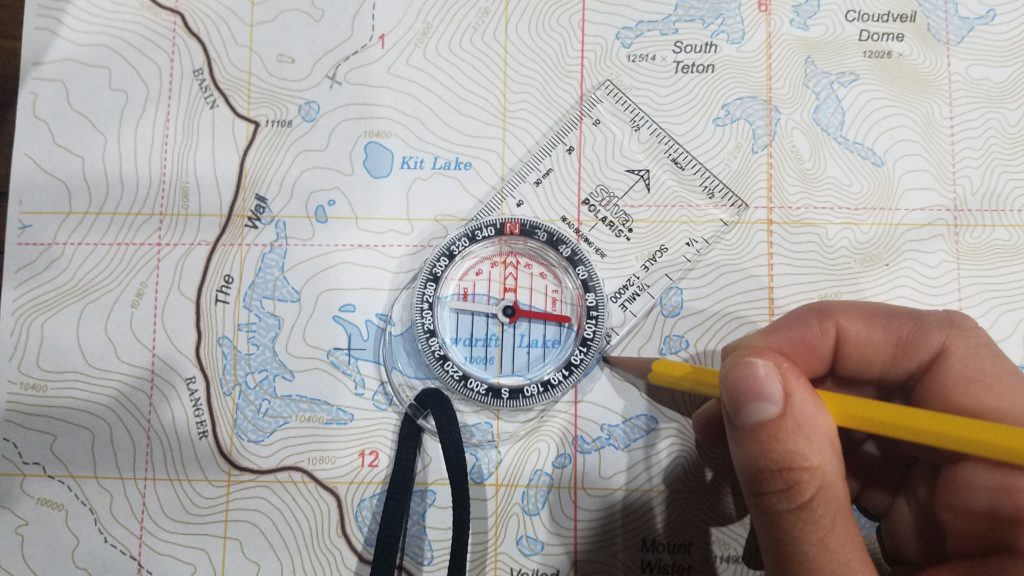
Taking a map bearing
Alright, you know how to follow a field bearing, you’ve practiced having your buddy give you bearings and you’ve followed them. But in the real world, you’re usually not going to just follow a bearing that your friend tells you to follow. Your bearing is going to come from your map.
Taking bearings from the map is useful in a variety of situations such as, when you’re hiking an off-trail route, or when the trail is buried under snow, or you can’t see your next landmark because of clouds or fog, or if you want to find a spring that isn’t visible to you from your current vantage point. The list goes on.
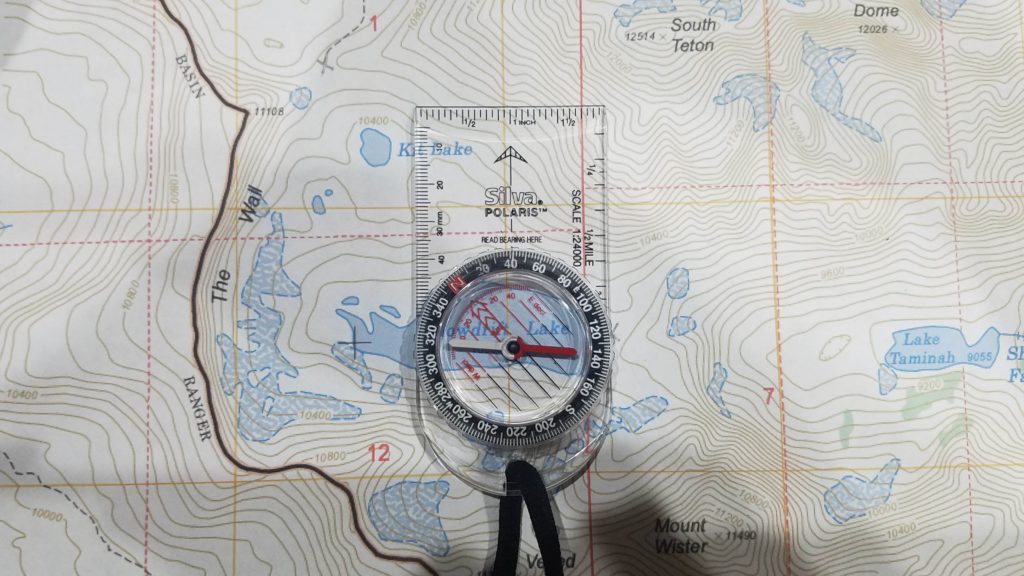
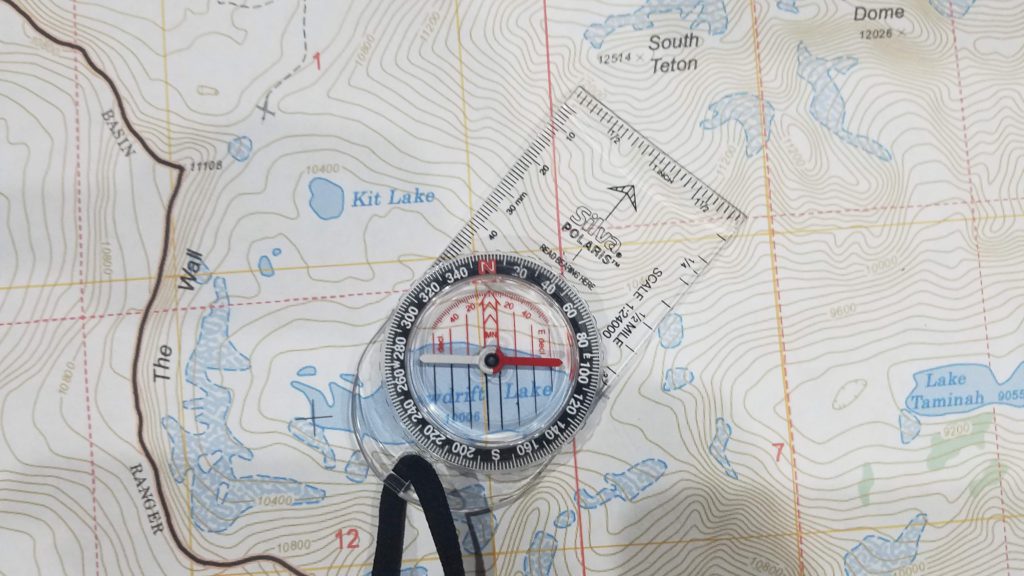
Let’s try it step by step. Click on a picture below if you want to enlarge it.
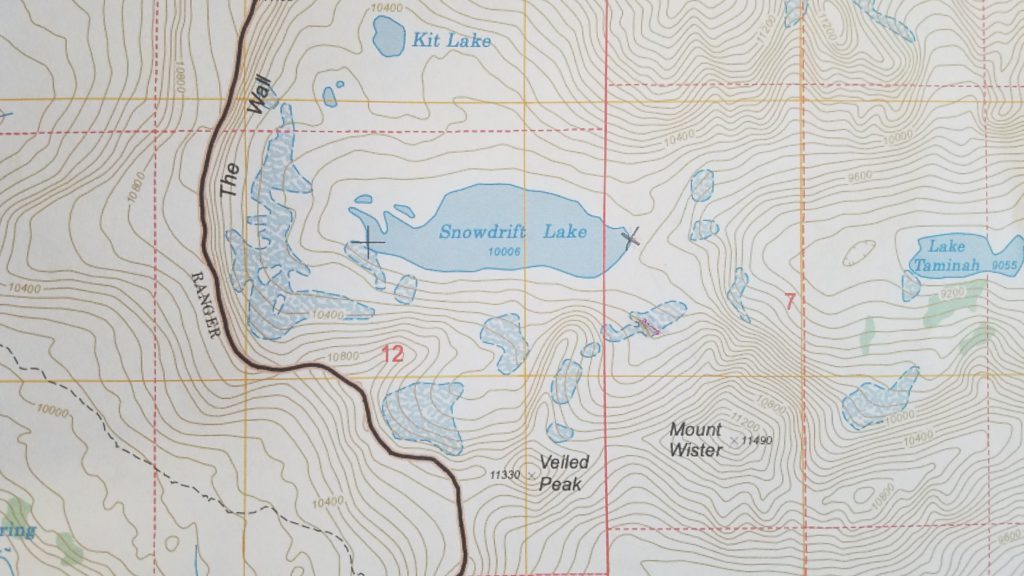
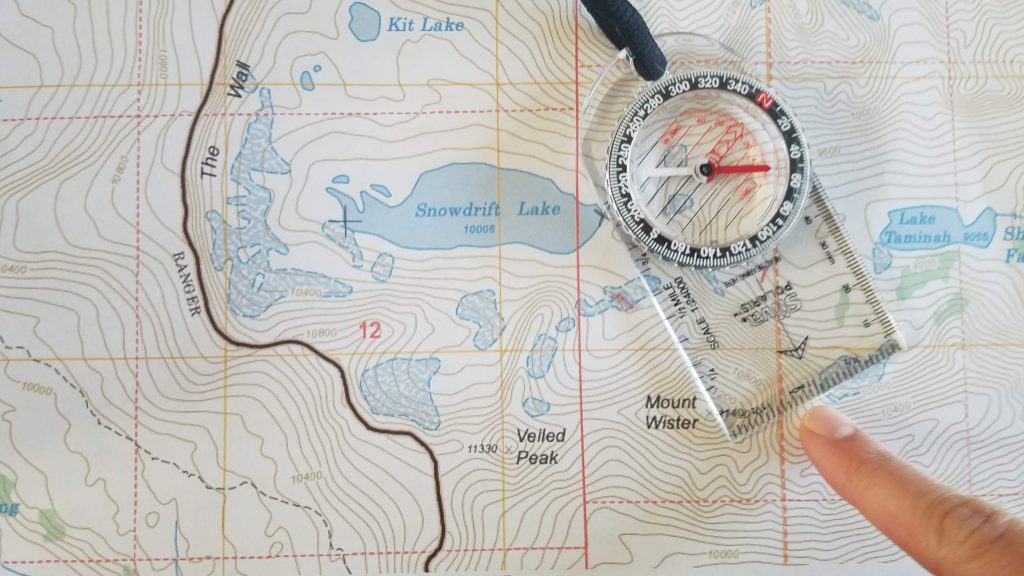
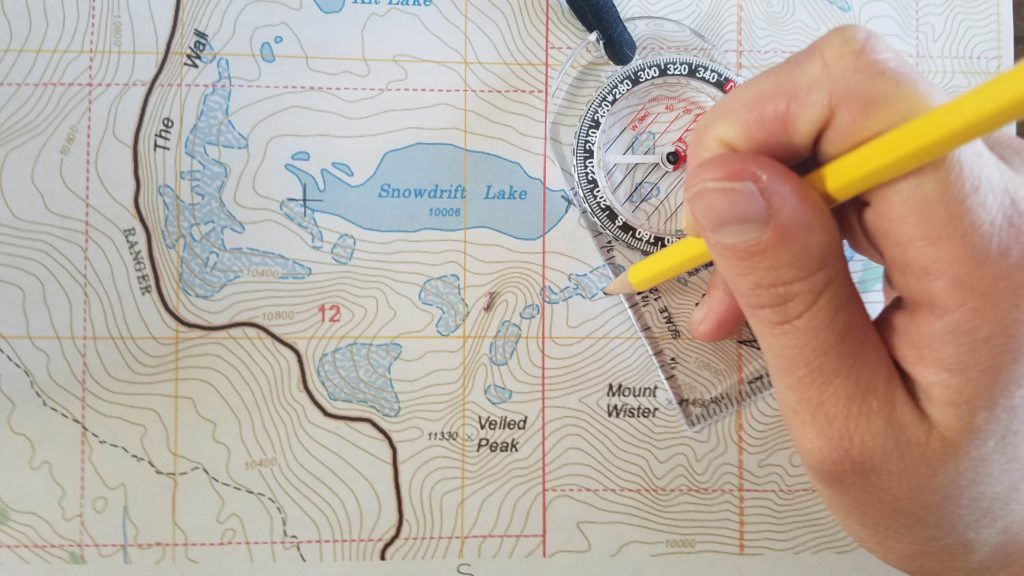
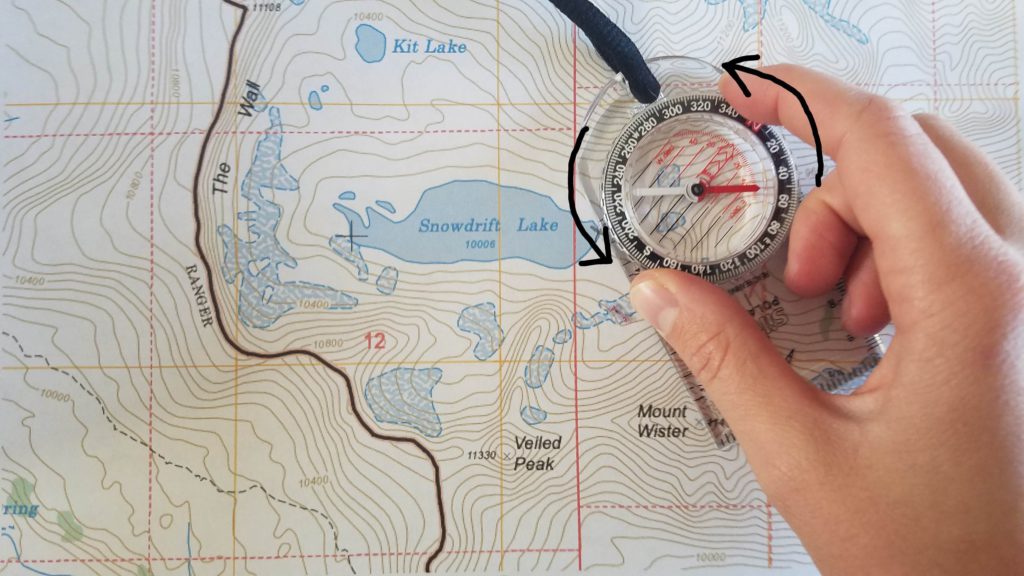
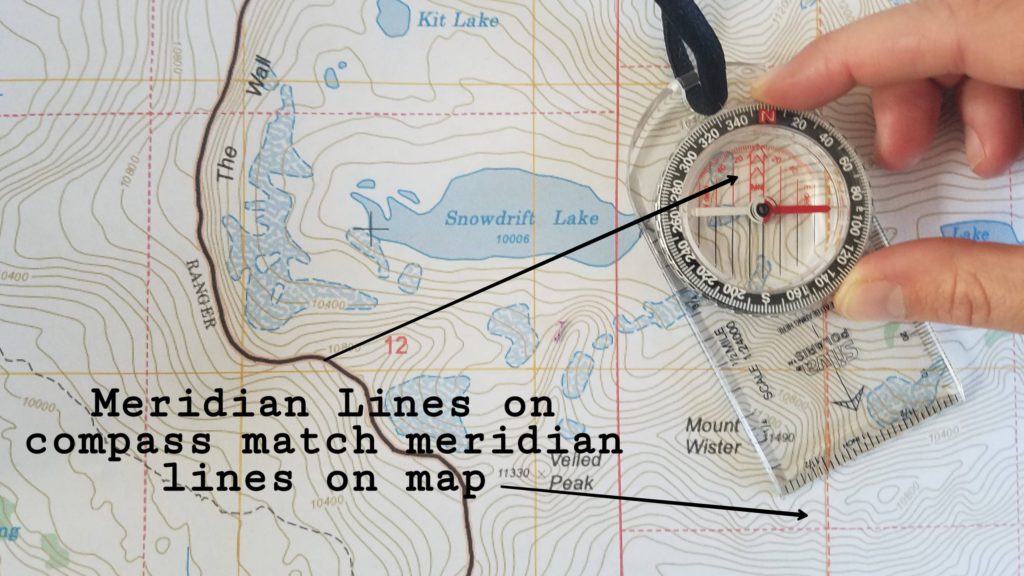

Now, there are a few things to take note of. The first is that we do not use the magnetic needle while taking a map bearing, it doesn’t matter where it is pointing.
The second is that the orienting arrow should generally be pointing north. If it is pointing south, it is still possible to make the meridian lines point straight up and down, but your bearing will be 180º off.
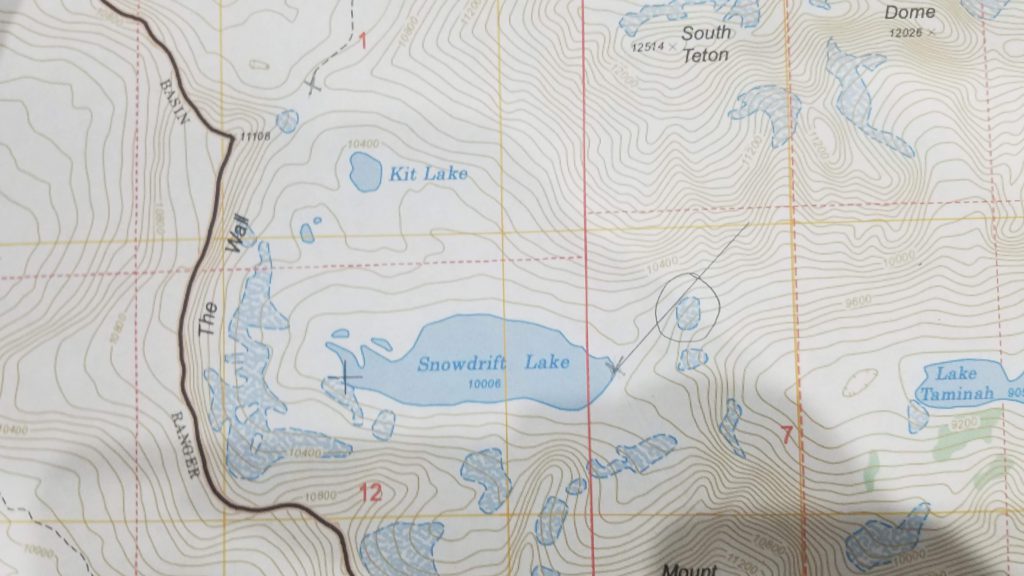
If you’ve done this process correctly you can follow the bearing just like you learned to do in the 1st navigation post, and it will point you straight at Mount Wister. However, when transferring a bearing from the map to the field, you will have to adjust for declination.
Transferring a field bearing to the map
The process of transferring a bearing you’ve taken in the field, onto the map is essentially the opposite of what we’ve just done.
Let’s practice.
You are still at Snowdrift Lake, you point your compass at a small glacier and find a bearing of 40º.
But wait! It may be a little off unless you’ve adjusted for declination.
Dealing with declination
In order to work properly with a compass and a map, you’re going to have to understand exactly how to account for declination. We already went over the basics of what declination is, but now we need to understand how to effectively work with it.
The top of your map points to true north, but the needle on your compass points to magnetic north. Because of this, every time you transfer a field bearing to the map or vice versa, you need to adjust for declination.
There are a few different ways we can do this.
If you have a compass with adjustable declination, then all you need to do is set the dial correctly according to the compass instructions, and you’re all set. You don’t need to have any further worries about declination until you go to a different area, with a different declination.
If you don’t have a compass with adjustable declination, the traditional method is using addition and subtraction. Warning: just skip the next few paragraphs to go straight to the easier methods.
Let’s say you took a field bearing of 280º and you want to transfer it to your map. At the bottom of your map the declination scale gives you a magnetic declination of 12º East. You would then subtract 12º from 280º to adjust your bearing to true north. 280º-12º=268º and this is the bearing you would plot on your map.
If you had a declination of 12º West, you would add instead of subtracting.
And if you were transferring a map bearing into the field instead of a field bearing onto the map, then again you would need to do the opposite for each situation. As you can probably tell this can be complicated and confusing, and lead to errors in the field.
Luckily, I’ve found a couple of different “hacks” we can use to make the process much simpler, even without an adjustable compass.
Hack #1: Draw on your compass1
You can essentially turn your plate compass into one with adjustable declination simply by drawing on it. Use either a wet erase marker, an oil-soluble pen, or, my personal favorite, a dry erase crayon.2
Simply mark the declination on your compass housing and use it in place of the orienting arrow. I used post-it notes to accurately mark a straight line, but you could probably eyeball it pretty well.
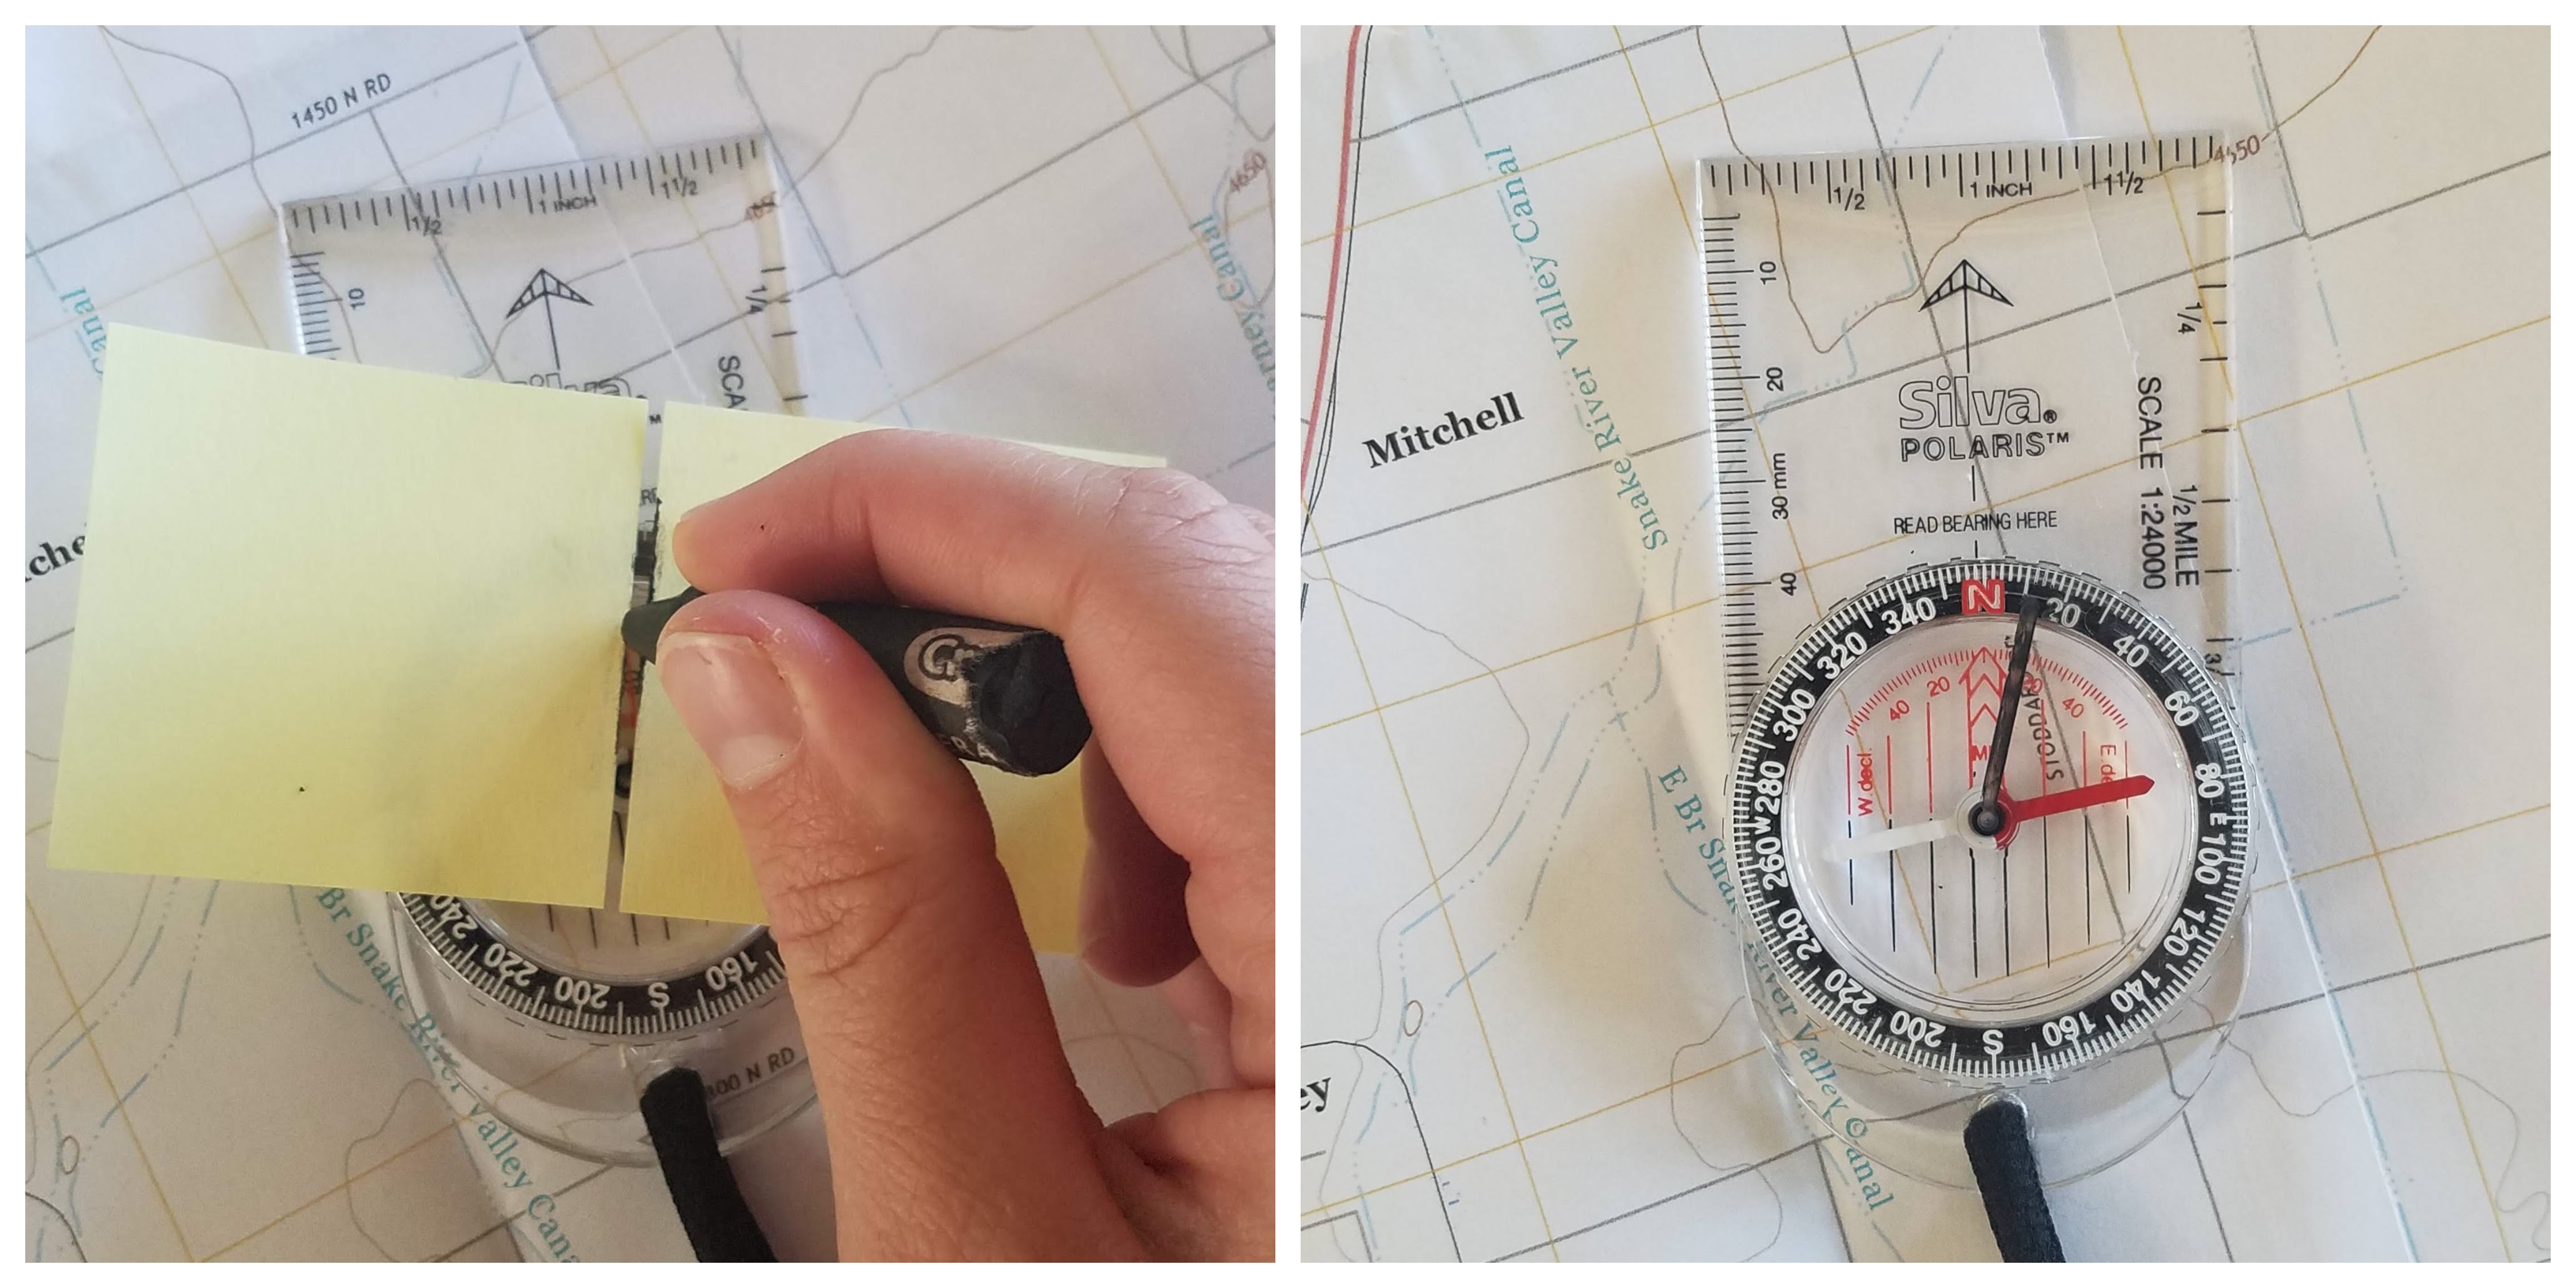
If you use this method just remember that when you take a map bearing, you can no longer use your meridian lines. You must orient the line that you drew north to south instead of the meridian lines.
Hack #2: Draw on your map3
This requires a bit of work from the getgo but it solves the meridian line problem you create if you draw on your compass, and once it’s done you don’t need to mess with declination again.
Line up a yardstick with the magnetic north line shown at the declination scale.

Trace along the edge of the yardstick all the way across the map. Then line up the edge of the yardstick with the new line you just drew, and draw another line. Keep going until you’ve drawn these new lines across the whole map.
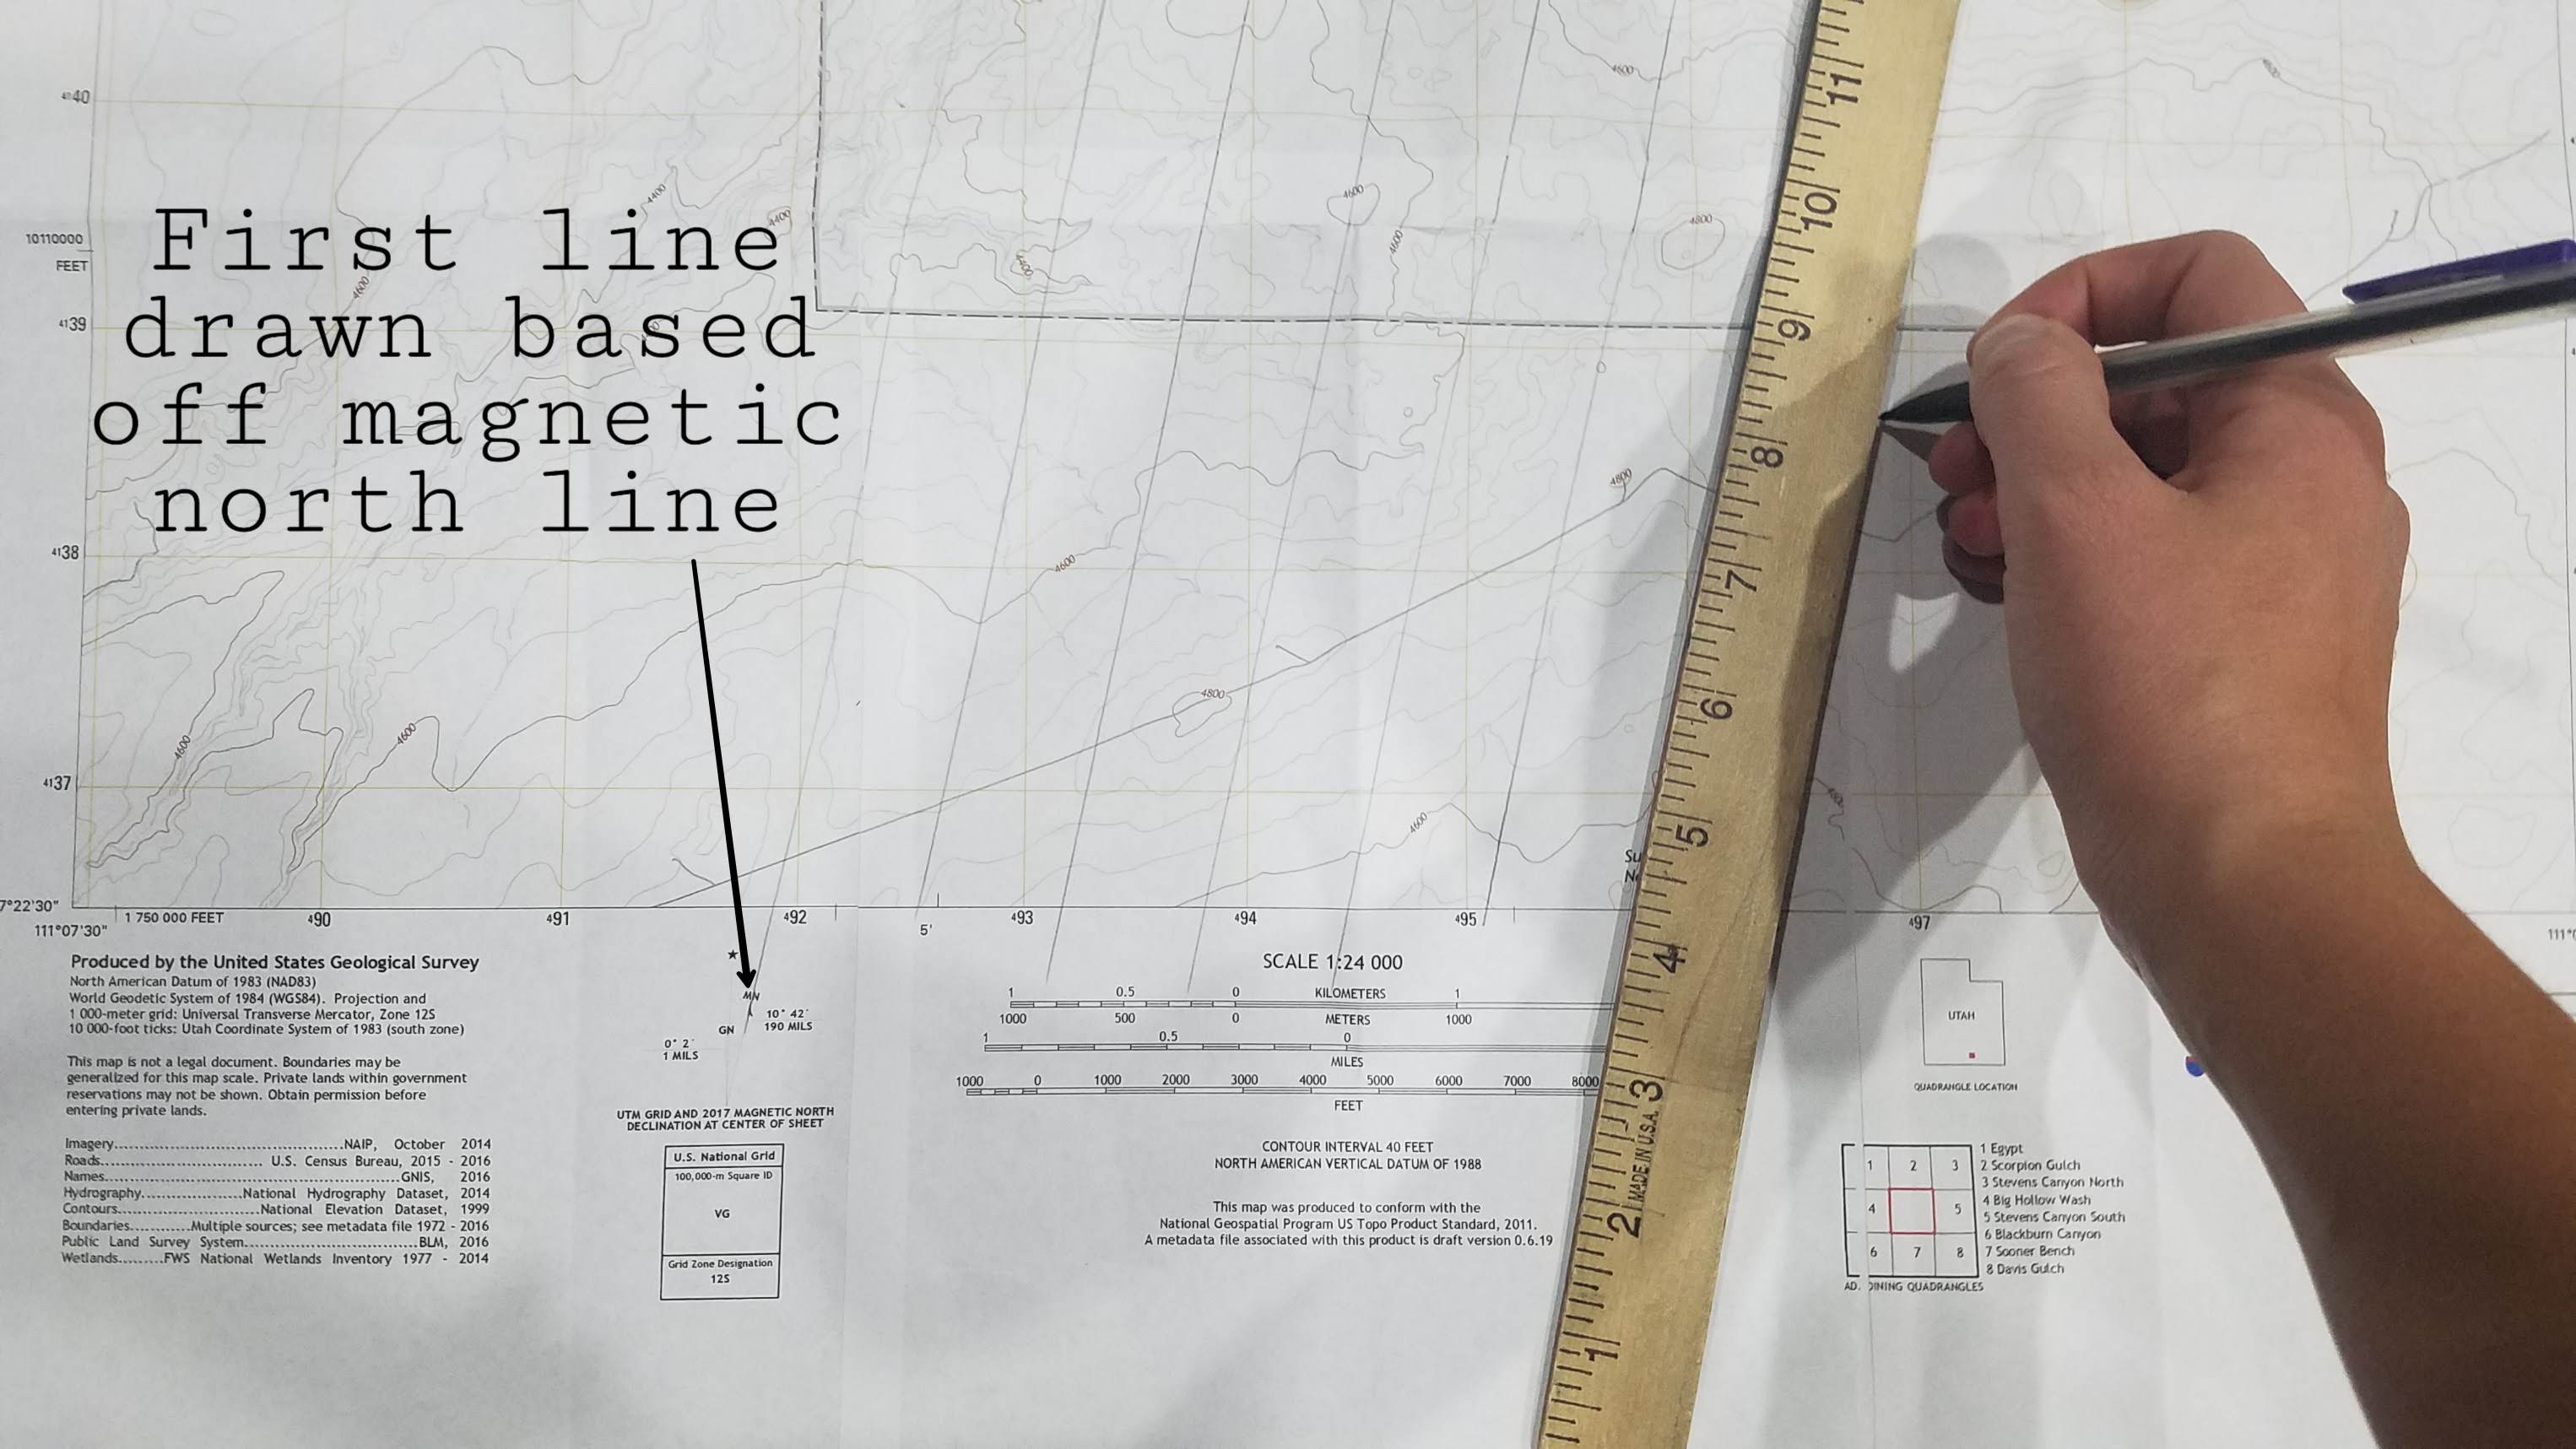
Now whenever you take a map bearing, use the lines you’ve drawn as your new meridian lines, instead of the map edge or original map meridian lines.

I love this map hack because it takes all the compass adjusting and math out of the equation. If you simply prepare each of your maps beforehand, then you don’t have to readjust declination at all. Ever.
The one downside to this is you have to use newer maps. If your map is more than 15 years old, then the declination of the area has probably changed enough to render this trick ineffective until you get a newer map. Or you can look up the current declination and use a protractor to draw an updated diagram.
Orienting the map
Now that we’ve figured out declination, another important skill you need is orienting your map in the right direction. You can often find the general direction intuitively if you’re familiar with the area, or on a trail, in a canyon, etc.
But it’s still a good idea to orient your map so that all directions match up with the real landscape and check your location and destination from time to time, to make sure you’re on course.
This is really quite easy to do. Simply set your compass to north and adjust for declination. You can add/subtract if you need to, but if your compass or map is adjusted in one of the ways discussed above there is no need for this.
Place your compass flush with the edge of the map so that the direction of travel arrow is pointing to the top of the map, and rotate the map and the compass together until the magnetic needle is in the orienting arrow or shed. That’s all there is to it! Your map is now pointing the right direction!
Remember, if you are using one of the map hacks we’ve learned, you may be using one of your hand drawn meridian lines instead of the map edge, or you may be using a hand-drawn line on your compass instead of the orienting arrow.
Take it slow, and remember to practice
Congratulations! We’ve covered a lot today. You’ve learned how to take a map bearing and transfer it to the field, how to take a field bearing and transfer it to a map, and how to orient your map. You’ve also learned several ways to adjust for the declination.
If you feel overwhelmed with everything you’ve learned, that’s totally understandable. Just focus on one piece at a time, and move on when you’re ready.
The skills you’ve learned will be solidified when you put them into action and practice. Be sure to practice in low-risk situations, like on trails and in familiar areas before moving out into the unknown.
If you are able to, go backpacking or hiking with an experienced navigator! Then you can practice your skills in unfamiliar areas and still get some help in case you forget what to do or make a mistake.
If you have any questions, comments, or tips you’d like to add, leave them below.
Now go ahead and hit the trails!
- I discovered this trick from Ron Watters, a professor at Idaho State University, you can visit his full explanation here
- I find the dry erase crayon is the best compromise between ease of erasure when you need to change the declination, and permanence so it doesn’t just get brushed off by some rain or your hand on accident. But they can be hard to find, so feel free to use a marker instead.
- I recently learned about this trick when I came across This video by Survival Resources
17 thoughts on “How to Use a Compass with a Map- Become a Navigational Superstar”
It’s been years since I’ve done any orienteering, but this brought back a lot of memories. Unfortunately, I’ve forgotten quite a bit in the past nearly three decades, so thanks for the refresher course! I’ll be bookmarking this to use with my boys, who really need to learn it, too.
Awesome, I hope you have a great time practicing with your boys!
Hi and what a great skill set it seems you have. The way you describe in detail how to vastly improve your navigational skills is superb. It seems there is a lot to take on and I would like to know is it essential when going on one of these adventures that you go with someone more experienced at first in order to learn these things first hand? Thanks Kenny
It is helpful to go with someone who is already experienced. However, if you practice the skills and become confident in them, you can definitely do easier, more straight-forward trips and then perhaps work your way up to more difficult ones.
Hey Mariah: I am absolutely fascinated by your very clear explanation about how to use a compass and a topo map to navigate. I even read the suggested compass-reading how-to first. (I was already in trouble there since I did not do this with compass in hand.)
I think my brain has been stretched to its limit by this beautifully done post. (Sigh!)
I really would like to be able to do this, but I think I will probably need to find someone knowledgeable who can SHOW me how to do all this stuff. Reading about it (even with the excellent visuals) just leaves me scratching my head.
Have you considered trying a YouTube training video?
No worries Netta, I know it can be overwhelming at first. That’s why I tried to break it down into a few different articles in the hopes that people would take it slow, get confident in one thing before moving on to the next.
I am hopefully going to be adding some videos to these posts soon! It’s on my list.
This was absolutely fascinating to read. I was once a girl guide and learned how to use a compass but I never once came across the term. declination in relation to following or determining a route on a map. I had no idea there was so much involved with orienteering, tending mostly to walk in groups and along known routes.
Now I am 71 and still recovering from a surgically repaired achilles rupture so will not be hiking for some time now. However I have a 17 year old grand son who is an avid back packer/ hiker and is currently doing his Queens Scout so I will pass this information on to him.
Do you always carry a compass, ruler protractor with you when you hike? It is a good idea when you are taking “off the beaten track” routes.
Thanking for the lesson so well described and illustrated.
I’m not familiar with the term Queen’s Scout but it sounds awesome. Please do pass the info along to your grandson.
While I’m in the field I carry the compass and map with me, but anything that would require a protractor or a ruler I do beforehand while I’m still at home.
Wow, I have hiked for years without a compass as I have stayed on marked trails. The last few years unfortunately hiking came to a halt because of old knee injuries. Now I have one new replaced knee and will be getting a second one within the year. Great news is, I can take up hiking again.
Reading a map with a compass really interests me,your post was very detailed, it sounds like a hard skill to learn. Did it take you a long time to learn to read a map with a compass? I am going to go back and read your other suggested posts, will this make it easier to understand this post?
It has always been a dream of my husband’s and mine to hike for two or three days at a time, but then my knees gave out. We to this point had only day hiked. But maybe it will be possible to pick that dream back up and work towards it. We have always used marked trails, but I would like to learn to operate a compass to read a map. How do you suggest I start that prior to hiking again? Can I learn everything I need to know right in this website alone?
Mary
I’m so glad you will be able to hike again soon. I think that using a compass and a map sounds intimidating at first, but once you actually start doing it then it’s not as easy as it seems. Just make sure to practice in low-risk situations, don’t just go off-trail in unfamiliar territory right from the start.
Yes read the other posts that I’ve written, those are actually meant to be read first, so they will help you better understand this post.
There’s a lot of good info on this website but there are probably a few things that you won’t be able to learn here as of yet. I am writing new articles all the time so you can check back frequently. I truly hope that you can reach your goal and take a weekend backpacking trip! I think the biggest things is to plan where you are going, and plan each day out in detail.
If you have a good plan, you will have a good trip!
Let me know if there are any specific topics you are wondering about or want to learn and I can definitely write some articles for you!
I can’t tell you how long I have needed to find your post! My wife bought me a really cool compass a couple of years ago and it literally just sits in my desk drawer because I have no idea how to use it. I always wanted a compass and then when you throw the math in there, I was kind of scared to be honest. Thank you so much for this incredibly thorough walk through about reading a compass. I think this is a skill that anyone who spends time camping, or hiking should learn. I really think my brother would love a nice compass and then he and I can learn how to do this together. Do you have any recommendations on a good compass? Thanks again, I look forward to hearing back from you.
Hi Steve!
Awesome, i’m glad you found this article helpful to you. Go ahead and check out this post to see my recommendations on a good compass.
Hi Mariah,
Thanks for this informative and educational article on How To Use Compass With A Map. I learned some great and useful tips on how to take a map bearing and transfer it to the field and vice-versa. This knowledge will give me the peace of mind whenever I’ll go backpacking and can’t wait to apply what I’ve learned.
Awesome! Let me know if you have any questions.
This is a very useful skill to have, thank you.
I thought your article was amazing. In my outdoor living class at school we are learning orienteering and your article was very helpful.
That sounds like an awesome class! I’m so glad you found my article helpful. Maybe you should share it with your classmates, they might find it helpful as well. 🙂